The biggest fault with most photographs is failing to fill the frame with the main subject. The main cause of this problem is not looking at the complete scene through the viewfinder. As long as the main subject is in there…somewhere, they just shoot. Many photos are a disappointment because the camera user does not take enough time to look carefully through the viewfinder at what they are about to take. The solution is simple, and can be done with any camera:
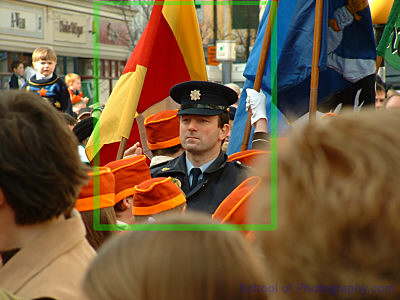
It is important to “read” the entire viewfinder. Press the camera as close to your eye as possible and look carefully at the whole scene. Practice looking at all four corners by looking from top left to right and then down and around. Make the necessary adjustments to the composition and then the photo is ready to be taken. When taking photos in crowds, it is very difficult to isolate the subject and make it clear in the image. In fig 1 there is a lot happening in the image. The main subject can be identified but he is fighting for attention in the image. Getting in close and keeping a tight viewpoint on the main subject will clearly identified it. Remember to always Communicate the Purpose for taking the image by clearly Identifying it.
Assuming you are using a digital, 35mm or APS camera, you will note that your pictures are rectangular. This gives you the choice of two formats, a horizontal or “landscape” format and by turning the camera through 90° you also have a vertical or “portrait” format. Use these different formats to maximize your subject. The cropped version of our original image (Fig 2) is a good example of how getting in closer and using a different format can improve the image. This is a typical example of the way an image can be improved just by changing the format. Fig 2 was taken in the portrait or vertical format. Turning the camera to the vertical format helps to close in on the subjects and isolate them in the image thus improving the composition. A good rule of thumb to start with is to hold the camera horizontally when taking photos of groups of people (3 or more for example) and hold it vertically when taking one or two people. There are no hard and fast rules in the composition of photographs, there are only guidelines. Using both formats will help you to develop a way of looking at a subject, filling the frame with what is important and excluding the ‘clutter’ |
||
| For more, join one of our photography courses. See further information here. |