Digital Photography tips: in this article we explain about digital image compression and image re-sizing.
Image size is usually measured in pixels (dots) instead of inches or millimetres for example 3000 x 2000 pixels. File size is how much space the image takes up on your hard drive, this is measure in bytes or kilobytes. Many image files can be quite large (over 3000 pixels on the longest side), this results in high quality images with large file sizes. File sizes are measured in Kilobytes or more often Megabytes.
Keeping them in their original file size preserves image quality. However, when sending images by email or posting them on websites, large file sizes are usually far too big to send efficiently. So you need a way to reduce the file size for quick transfer and faster downloads, without sacrificing the quality too much.
If the images are both resized (reducing both the width and height) and then compressed correctly (further reducing the file size) the time it takes to transfer them is remarkably faster. This saves both time and money spent online to send the images, especially if multiple images are included in one email. Faster smaller transfers are also more reliable especially if using a dial-up Internet account or small free email accounts such as hotmail.com
Re-sizing the image dimensions and compressing the image are two different practices:-
- Re sizing means changing the number of pixels that make up the image.
- Compression means reducing the amount of information that is stored in the image file.
Jpeg image files are internationally recognised as the standard compressed photographic file type and can be compressed to a very great extent.
Digital Photography Tip 1: Re-sizing the Image
In our examples we will use Paint Shop Pro (free evaluation copy is available from www.jasc.com) but most image editing programs and many image management programs have re-sizing facilities. How these are used vary slightly from one program to the next but they all deliver the same results.
Open up an image you want to compress in Paint Shop Pro (or your image editing program). Go to the menu and select Image > Image Resize . In the Dialog box that opens, you will see that there are a few ways your image can be resized. Be careful though, some of these methods can distort the resulting image if the settings are not correct.
With Paint Shop Pro the resize setting defaults to the settings used the last time the dialog box was opened, and not the current size of your image as with some other programs.
To view the current image size in Paint Shop Pro select View > Image Information . However other image programs may show the size of the current image viewed in the Image Size dialog box.
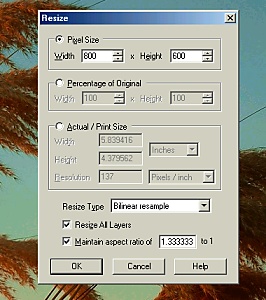 |
What we will also concentrate on in this lesson is the best method of re-sizing for an image for monitor or web display. At the top of the dialog box is ‘Pixel Size’ (fig 1). Click on this and the width and height dimensions will be clearly displayed. Before altering these make sure that the ‘Maintain Aspect Ratio’ box is checked.
Once this is done, altering either dimension will automatically alter the other. If it isn’t checked, the image will be distorted. In the box marked ‘Resize Type’ there are a number of re-sizing methods, Paint Shop Pro recommends ‘Bilinear Resample’ for reducing image sizes.
For best quality display we recommend that an image should be approximately 800 pixels in length on its longest side. For example if the image is taken in the landscape or horizontal format, the width would be adjusted to 800 pixels. If it’s a portrait or vertical image, the height should not exceed 800 pixels.
Once you have made the re-sizing adjustments, click ‘OK’. When you close the dialog box, the image will be resized.
Once the image is resized it may have lost some sharpness, particularly when reduced from very large images. So you can then use a sharpening filter to fix this. Be careful not to overdo the sharpening though as it will detract from the quality of your image.
Digital Photography Tip 2: JPEG Compression
If you are happy with the re-sizing results it’s now time to save the image.
IMPORTANT: DO NOT click on ‘Save’ just yet!
If you do you will overwrite the original large image which you may want later. Instead select File > Save As and the Save As dialog box will appear.
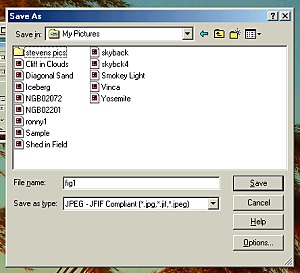 |
In the File Name area simply change the name of the image by typing a new name in the box. This preserves the original unaltered (fig 2).
In the Save As area there are many file types to choose from in the drop down menu, select jpeg .jpg.
Before we save the image we will look at the compression options available to us.
Depending on the program you are using, the jpeg options window will open in one of two ways. Either by clicking Options on the Save As dialog form we are on (as with Paint Shop Pro), or it will appear once after you click the Save button (as with PhotoShop).
IMPORTANT Always click on Options before saving using Paint Shop Pro or the image will be saved in the default compression setting.
As for other programs, if a compression option doesn’t appear, check your settings so that it will. This is the only way you can have control over how well compressed your images will be.
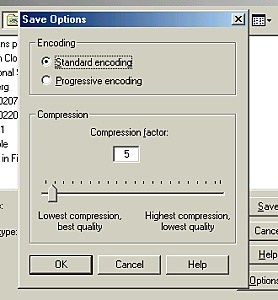 |
On the Save Options dialog (Fig 3) there is a slider compression adjuster. Adjusting to the left increases the file size and quality while moving the slider to the right reduces file size but this also reduces image quality. Be careful and check which way your program uses the slider, for example if using PhotoShop the opposite is true, with the smallest file size on the left and the best quality and larger file to the right.
Finding the right setting will take a bit of practise as the image size will also play a part in how much quality will actually be lost. In the image size we have recommended for this exercise, the compression quality should not exceed 20 in Paint Shop Pro. You can also check the final file size in Windows explorer, just right click on the file and select properties. This will display the file size either in Kb or Mb.
Over Compression
It is very important not to over compress the image. This will cause a significant loss of quality. It would instantly be noticeable as color separations increase, in particular where subtle changes in color are present in an image such as skin tones and skies. It would be a good idea to experiment with your image compression settings in order to get the best possible results.
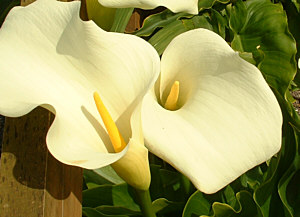
Here are two images from the same original image that were saved at different compressions. Fig 4 was saved at a compression quality of 10 resulting in a jpeg file size of 23.5kb. Fig 5 was saved at a compression quality of 70 resulting in a file size of 5kb. The latter image is much smaller but notice how the lilies in Figure 5 are very blotchy due to over compression.
fig 4: Compressed Image
fig 5: Over Compressed Image