
Photographing Winter
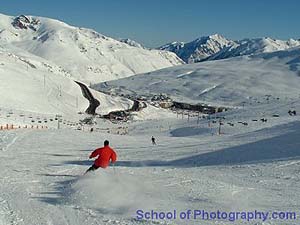
fig 1 Red Skier
Winter can provide as much breathtaking photography as any other time of year. This of course is provided that you can take a long intake of breath and brave the elements. Naturally when we think of winter, snow immediately comes to mind even though in most parts of the world, snow rarely falls.
Snow can change the appearance of a landscape or area dramatically. It also opens the doors to many photogenic outdoor activities from building snowmen to skiing. Snow and ice also offers many opportunities for close up and abstract images.
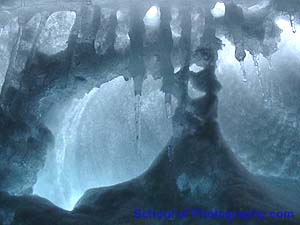
Fig 2 was taken inside a window that was completely covered by a snow drift. Icicles had formed from the eave above and despite its cavernous appearance, this photo was taken from a very close up position.
There are a host of complications when taking photos in the snow for the photographer, equipment and the resulting images. Here we will take you through these and ways to overcome them.
Preparation
fig 23.2 Ice Form
Before even thinking about camera gear or anything else to do with photography, prepare yourself first, especially if you are unfamiliar with snow conditions. In many parts of the world where snow is a regular feature, conditions can change dramatically in a short instance. What may start out as a sunny day could quickly turn to blizzard conditions. The temperature will drop drastically as well once the sun goes down.
It is vital to stay warm and dry, especially if you plan long periods out of doors. Many layers of light clothing is more effective than one or two heavy layers. Waterproof outer layers are vital. Gloves, preferably waterproof, are also essential even though they can often hamper the use of photographic equipment. Numb fingers though will also prove useless in handling a camera! The risk of camera shake obviously increases as we are inclined to shiver.
When walking or hiking in wilderness or mountainous areas, stick to designated paths or roadways, DON’T wander into unmarked open areas. Snow can often build quite high, known as drifts. These can cover very uneven ground, even deep gorges, to look like level areas. One could fall through becoming injured or trapped to say the least. Get advice from local officials if you aren’t familiar with the area.
On sunny days it can become quite warm, despite a good layer of snow on the ground. It may sound odd but a facial sun block and sunglasses is also a consideration if you plan long periods outdoors. Ask any skier and they will tell you that getting sunburned is a real possibility. Glare is also a major factor as the sun reflects strongly off the snows white surface.
Equipment
fig 23.3 Wrap up Warm
Cold conditions are quite testing on camera equipment, especially as all are now battery dependent, that may freeze or shut down in extreme cold. The totally mechanical film camera is king in these conditions, though these types of cameras are becoming harder to get.
Keep your cameras and lenses in well insulated camera bags and only take them out when taking photos, avoid hanging them over your neck or shoulder for long periods. Another alternative would be to keep them under your overcoat where your body heat will help keep them warm and dry. Remember that snow is wet so keep it off your gear.
Lens fogging commonly occurs with sudden changes in temperature. This can lead to permanent damage of lenses. When coming in from the cold, introduce your camera equipment gradually. Leave them in the sealed camera bag for an hour or two so the temperature inside the sealed bag will come up gradually. If you’ve kept your camera under your garments or in your pocket, leave them in the coolest part of the house such as a shaded windowsill for an hour or two.
Keep your equipment to a minimum and make sure you can carry everything comfortably without compromising your balance. In snow and ice it is much easier to slip and fall. A load of equipment and heavy camera bags will put you off balance, increasing the risk of falling and injuring yourself or damaging your gear. Backpacks, equipment vests and waist holsters are much more suitable ways of carrying your gear.
Some sort of camera support is essential in cold conditions. Cold causes shivering which leads to camera shake, especially when you’ll need to take off the gloves when taking photos. Despite appearances, light levels can be quite low, especially when it is snowing. A tripod can be cumbersome and may be hard to carry unless it can be attached to a backpack. A Monopod is more suitable and sturdy models can double as a walking stick!
Exposure Technique
Most camera light metering systems can have difficulty exposing a snowy scene correctly. Camera meters read the light that is reflected off the subject they are aimed at. In most situations where there are many shades and colours present in a scene, this poses no problems and a correct exposure is easily achieved by the camera. This is because a cameras meter may read off many different areas in a scene and is primed to average out areas of equal darkness and lightness. However when a scene is mainly made up of one colour or shade, metering problems can occur.
The colours or shades that pose the most problems are black and white. Metering off a mainly black or very dark coloured scene will fool many meters into assuming that there is very little light, despite the presence of strong lighting. Therefore the image will become overexposed, turning blacks to murky greys. Scenes with mainly white colouring or shade cause equal difficulties, this time though the meter assumes that there is more light present than there actually is, even when light levels are quite low. This leads to underexposure and what is meant to be white in shade also appears as a murky shade of grey in the final image.
Snow of course is white and can reflect much more light than other colours, this could lead to the image underexposing. Instead of crisp white snow appearing in your image, you could be confronted with a murky grey appearance of snow and darker colours and areas in the image losing detail or being blacked out. Now before we go any further it must be remembered that there must be a certain amount of snow in a scene before an incorrect reading may come about. Just because there is a snow capped mountain in the background of your scene, doesn’t mean it will lead to an incorrect exposure.
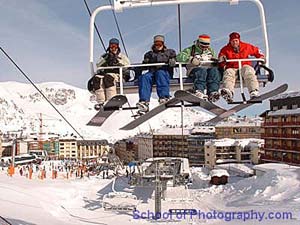
Fig 4 shows cars buried in the snow. The snow covers the majority of the scene and would have lead to underexposure if careful metering wasn’t applied. fig 5 has many more shades and colours as well as snow. No compensation was applied to the exposure of this image because of the amount of contrast in shades and colour.
fig 4 Buried Cars
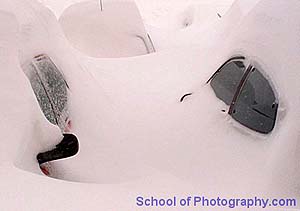
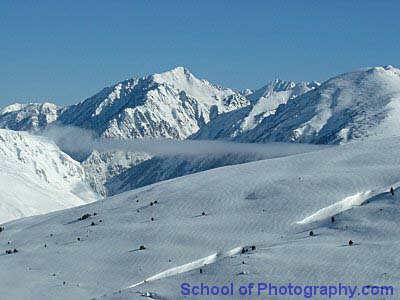
fig 5 Ski Lift
To counteract underexposure, the scene should be deliberately overexposed. For cameras with a manual exposure system, this isn’t a problem. Simply take a meter reading and overexpose the correct exposure by one or two stops. Bracketing will ensure one good image. If there is an object of mid grey in the scene, take a close up reading of that object and adjust your exposure for that, recompose and take the photo. A spot meter that is either built into the camera or hand held is a tremendous help in these circumstances.
Cameras with only automatic exposure systems such as compacts may be constrained by their lack of control but there are a few ways to ‘fool’ these cameras into exposing correctly. Most exposure and focusing systems in these cameras are activated by depressing the shutter halfway but not taking the photo. Point the camera at another area of equal distance but with much more variety in shade. Depress the shutter halfway and hold it, locking the exposure and focusing reading. Recompose on the original scene and press the button the rest of the way.
Some cameras may have limited control of the metering system such as Exposure Compensation. This can be adjusted to under or over expose an image. Exposure compensation usually has adjustments from +2 to -2 stops in over and underexposure.
For much more on exposure and how best to control and utilise it, enroll in our Creative Photography Course.