
Restoring Sky Detail
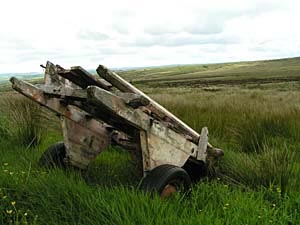
fig 1 Point and shoot exposure<
Have you ever taken landscape images with what you thought was a nice sky full of detail, only to find the skies are totally washed out when viewed on a large screen or in print? One problem with the digital camera is their poor exposure latitude. This is the ability to get a decent exposure of detail across a high contrast situation, in particular in highlight areas of an image.
One way of handling high sky contrast when taking a photo is to use graduated filters These filters can work very successfully bringing both areas of the scene to within an acceptable exposure ratio.
With a graduated filter, one half is dark and the other gradually goes to clear. The dark side of the filter would cover the brighter area or sky.
Graduated filters are also available in many colours although grey, being a neutral colour, does not change the original colour of the high contrast portion of the image. However their use can be hit or miss and the final result will depend on the density of the filter being used.
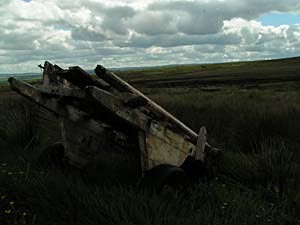
fig 2: 2 stops underexposure
Using digital editing, wide latitudes of contrast within a finished image can be brought together successfully once a bit of planning is carried out. This is achieved simply by taking two photos of the same scene. One would be exposed for the highlight areas of the image and the other would be exposed for the shaded areas. The technique is quite simple but must be taken into consideration at the point of taking the photos. The following is a step by step example of how digital editing can be used quite easily to get much more detail in a high contrast situation.
Fig 1 was taken just by exposing for the scene normally. There was a huge contrast between foreground and sky. As most of the image area is taken up by the foreground, the sky was completely over-exposed or (commonly termed as “washed out”). The exposure for this image is 1/200 sec @ f5.6 using ISO 50.
Fig 2 was taken by just exposing for the sky. This could be achieve in a number of ways either by aiming the camera at the sky, using a spot meter or reducing exposure through compensation until the most suitable exposure was achieved. In this instance the exposure was 1/800 sec @f5.6 with ISO 50.
Note also the huge difference in exposure between the two images. Image 1 was taken with a shutter speed of 1/200 sec while Image 2 was taken with a shutter speed of 1/800 sec. The other exposure values remained the same so this is a difference of 2 stops, which is quite dramatic for a digital camera.
For the purposes of this exercise it is extremely important that no other alterations are made when taking the two images other than the exposure. Both have to be taken from the exact same position at the same time using the same focal length and focusing distance. Therefore it is best to mount the camera on a tripod and use Manual focusing.
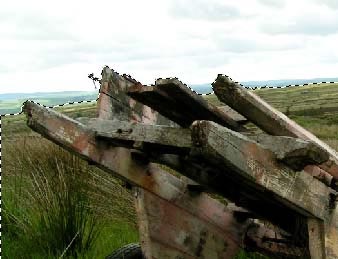
fig 3: Isolating selected area
We will now use an image editing program to correct the sky detail. In this example Adobe Photoshop Elements 3.0 was used, however, most digital editing programs will have the tools necessary for this procedure.
The first step is to isolate the area of one image that is to be preserved. In Photoshop Elements this is achieved by using a Lasso Tool. The sky area in this image is carefully isolated using the Lasso Tool by drawing along the “border” between foreground and sky.
Note in fig 3 the far background has also been isolated. The remaining area is over-exposed and wouldn’t look right in the new image.
Some Feathering may help to soften this line a bit in order to cover slight imperfections. In the case of this image a feather of 2 pixels was used. What amount of feathering is used will depend on the size of the image.
Once the area is selected in Photoshop Elements, it can be dragged or copied onto the other image. In the case of this example the foreground of the normally exposed image is dragged across to the under-exposed image.
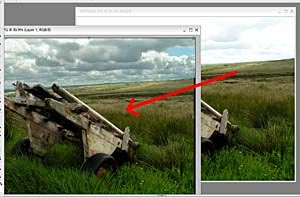
fig 4: Dragging the layer
Using other programs this operation may have to be performed differently. The selected area may have to be converted to a layer before it can be moved or copied.
Whatever form of dragging or copying is done, once the selected area is put onto the other image, it becomes a layer on that image. The selected area can be carefully moved to match into the background image.
The best way to join the two images is to magnify a certain part of the image and join together using the close inspection. Once one area is joined correctly, the rest should match providing both images were taken in exactly the same way. Any deviation of position or lens length between the two images will show as the whole scene will not join together perfectly.
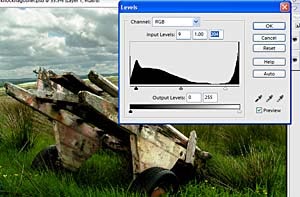
fig 5: Contrast adjustment with Levels
Now the background and layer can be joined together. In Photoshop Elements the command “Flatten Image” can be clicked upon in the “Layer” menu. However before this is done the two images may need some slight alteration in Brightness and/or Contrast in order to look more natural.
In Photoshop Elements the best way to achieve this is through “Levels”. Here all shades can be adjusted separately for maximum effect.
In our example slight adjustment of the new layer was carried out to increase contrast slightly in the dark and highlight shades. The final settings used are as seen in fig 5.
Once the brightness and contrast of the two images are adjusted satisfactorily, the image can then be flattened as prescribed previously. Once flattened any slight imperfections between the border of the two images can be touched up using tools like the Clone Stamp or Dodge and Burn Brushes found in Photoshop Elements. Because the join was very accurately made in this image, there was no need for such touch ups.
The final image is shown here (fig 6), which shows the results that can be achieved. The whole process should take only about 20 minutes. The most difficult task is using the Lasso Tool to select the area between sky and foreground.
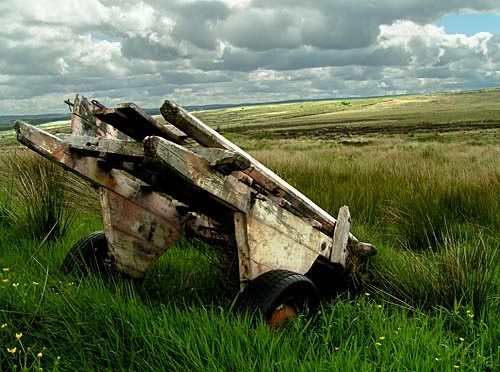
fig 6: Final Merged Image
Even if an image was taken without a deliberately underexposed partner, this technique can still be carried out using the sky from another image. In fact it is common practise by some photographers to take photos of interesting skies for the purpose of using them later in this way. However the success rate is limited as focal length and angle of view will dictate the success of an image contrived in this way. The best method is as carried out in this exercise.
For much much more on digital editing, enroll in our Digital Imaging Course.