
Paying Attention to detail when shooting can help transform a picture from a standard shot to something special. Often little is more, find out to bring out the best in your subject. This time we are looking at car photography.
| 1959 Ford Fairlane |
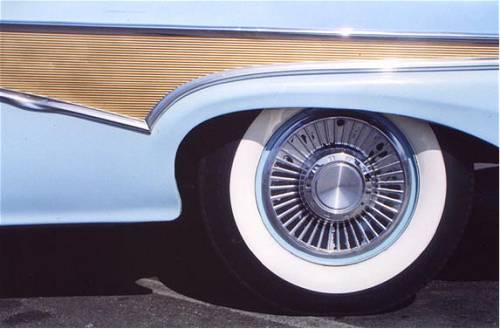 |
We are told by the photographer, one of our students, that this is the rear wheel of a 1959 Ford Fairlane. Cars and other forms of transport can make for great images. Not only an entire image of a car but also elements of cars in close up. There is great detail, particularly on older models that make for great graphic images.
Technical Quality
With this type of subject the focusing and depth of field have to be right on the button. In this case the photographer has produced a pin sharp image throughout. Although depth of field would not be a major consideration with the composition of this image, too wide an aperture would cause either the hub-cap or the body of the car to be slightly out of focus, depending on where the point of focus would be. In this case the aperture was sufficient to render all detail sharply.
The shine and colours on cars can cause great difficulty in achieving a proper exposure. Bright colours like white can trick a meter reading to underexpose and dark colours like black can lead to overexposure. Glare from shiny paint, chrome and glass can also mislead a cameras meter. The type of lighting can be crucial in the success or failure in photographing shiny objects like cars. It is often best to photograph cars on dull days; this gives less contrast and a reduced chance of glare. A polarizing filter is also a must for this type of work as it helps to reduce glare even on dull days.
This image was obviously taken on a sunny day, which produced very punchy contrast. This nearly works except for the small bits of glare on the chrome. The glare is so minor in the image, it doesn’t cause a problem. The black tire and shadow areas also lack detail but luckily enough most of this detail may have only distracted the image. The exposure overall is almost perfect but has a slight leaning towards overexposure. The white in the tyre almost glows with no detail being rendered. Underexposing by about 1/2 stop could also have enriched the light blue colouring of the car. Under the circumstances the photographer did quite well with the exposure.
Composition
With subjects like this one has to be meticulous in the way the image is composed and the subject is presented. The wheel is placed very nicely within the frame. A common mistake with images like this is to place the main subject in the center; this would have made all the rest of the detail in the image secondary in importance and even to become a distraction.
Placing the wheel to one side of the frame has allowed the chrome and side panelling to be accentuated in the image. This is a classic example of a good use of the “rule of thirds”, placing the wheel on a line a third of the way into the image. Also placing the wheel to the right of the image has given the viewer’s eye a “resting point” and keeps the viewers eye from being led out of the image.
Improvements
It is of vital importance to make sure everything is perfect within an image like this. All smudges, dents, scratches and dust marks should be eliminated from the image by either dealing with them or excluding them from the frame.
The major aspect that leaves this whole image down is the dent in the chrome. In this case either the other side of the car should have been used for this image or the dent excluded from the area of the frame. With this image, it is quite possible to crop out the area of the dent and still remain with a good image.
In Conclusion
This image is quite a good one; despite some minor flaws the image itself can be improved as is, with careful cropping and printing. With subjects like this it is always best to retake the image for best quality. Try and allow yourself a chance to go back for any retakes that are necessary. With subjects like cars, this is usually very possible to do.
More info…
If you want to learn more about all kinds of photography, take a look at our complete full length courses. All are tutor assisted with examples, full text and projects.
- Basic Photography Course For the beginner, this tutor assisted level 1 course assumes you have little or no knowledge of photography. Suitable for both digital and film users.
- Digital Photography Course This course shows how to capture digital images, use manipulation programs to add effects and enhancements, and print and display your work. Includes image restoration.
- Glamour Photography Course This level 2 course assumes you know your way around a camera. It takes you further with studio lighting setups, home studio, model portfolios, posing guide, multiple lighting guide, model releases, make up and more.
- Freelance Photography Course This level 2 course is essential if you want to make money with your camera. Imagine being paid to be do something you love doing, well you can now with School of Photography.com.
- Black and White Photography Course Have you ever wanted to learn how to develop film at home? Then go on to make your own prints using an enlarger in a darkroom? Then this level 2 course is the right start for you.
- Landscape Photography Course Find out how to improve your landscapes with this level 2 course. Packed full of illustrations, examples, full text and projects.