
Here we bring you answers to a few questions that are often put to our tutors. These are common faults which regularly come up when taking photos.
Q. Why are the people in my photographs so far away?
A. When taking a photograph, many people fail to look into the whole viewfinder or study the whole viewscreen. They aim the camera and once it is in the general direction of their subject they are happy. Some cameras that use a viewfinder, show a smaller area than area covered by the lens.
To overcome this, hold the camera right up to your eye or look carefully at the viewscreen and before you take the picture look at the whole image area. If there is a lot of space around your subject, either move in closer or zoom in with a zoom lens (if available) until the frame is filled completely with your subject.
When photographing one or two people, it is best to turn the camera vertically so the subject fits the frame better. This cuts down on wasted space in the image and composes people much better.
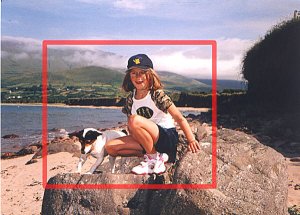 |
The original photo shown here is not the worst example of showing too much area in an image.
The suggested cropping of it (Red bordered area) shows how the photo could be improved by getting closer to the subject and filling the frame.
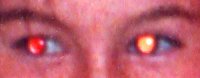
Q. Why do people in my photographs often have red eyes?
A. Many people blame themselves for the problem of red eyes in pictures. This of course is not the fault of the photographer or the people in the images.
Red eye is caused by the flashlight of the camera reflecting off the back of the eye.
 This happens because the flash on the camera is too close to the lens. The light passes through the retina and lights up the back of the eye. With compact cameras this is a very common problem. In order to make the camera ‘compact’, the result is that the flash is too close to the lens.
The problem is worsened in a darkened area, where flash would definitely have to be used. Our eyes dilate and our pupils become bigger in order to compensate for the lack of light. When this happens there is a much greater chance and more pronounced red eye affect. This is much the same affect as dazzling an animal with the headlights of a car or flashlight at night.
To reduce this affect, camera manufacturers have Red eye Reduction features in many of their cameras. How this works is that a number of ‘flashes’ are emitted before the picture taking flash. The idea is that the first few flashes will close the pupils in the subject(s) eyes before the picture is taken. This method of course only reduces the red eye effect and seldom eliminates it.
The surest way of eliminating red eye is to move the flash as far from the lens as possible. This, naturally, is not possible with compact cameras, but is easily achieved with cameras that use separate flash units which can be held off camera.
Many digital editing programs have tools for removing red eye from an image. Most are quite apt at doing a perfect job.
Q. When I get my 35mm photographs enlarged to 10″ x 8″, some of the picture is missing at the edges. Why is this?
A. This is very simply because the 35mm image frame is not proportional to 10″x8″. The image size on a 35mm film is 36mm x 24mm. This is a proportional ratio of 3:2. The proportional ratio of the 10″x8″ paper is about 2.5:2. This actually isn’t as confusing as it sounds.
Imagine that you have a rectangle of 2 1/2″ x 2″. Now try and fit a rectangle of 3″ x 2″ into it. The 3″x2″ rectangle is 1/2″ too large okay. Therefore you have to cut off 1/2″ of the 3″x2″ rectangle to fit them properly. The same thing happens to the width of your negative when enlarged.
Print sizes are standardised to suit many types of negatives. Unfortunately some sacrifices are made in cases such as the one we just discussed. In fact most print sizes, even the en-prints you get back from the processor do not show the whole image on the negative. Try comparing your negative and the print that came with it. More than likely there is a bit missing off one edge.
Digital cameras can also suffer from this problem. This is because the proportion of the image sensor inside the camera may be slightly different to the standard print sizes. However most commercial processing systems remedy this by providing an option to show the full image, even if a border may appear on the print.
 |
In this example the full frame of the image represents a 6 x 4 inch print from a 35mm negative.
When enlarged to 10 x 8 inch the areas outside the red frame will be lost.
The best way to ensure that you get everything in the image onto a print is to allow a certain amount of space at either side of the view. If you are photographing a group of people for example, allow space for an imaginary person on either side of the group.
For answers to all your photography questions, enroll in one of our courses today!