
Blurring the Background
A portrait can be enhanced by an out of focus background and it is a commonly used technique by portrait photographers. Doing this isolates a sharp main subject and gives an image a three dimensional quality. At the time of taking a photo this effect is achieved by using a wide aperture (small f-number) and telephoto lens. Sometimes it isn’t that easy to achieve, especially when taking a photo using a standard to wide angle lens as was the case with our original image in fig 1.
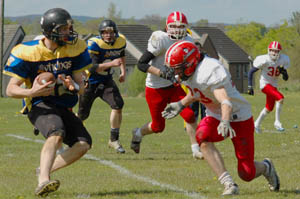 |
Fig 1 is the original image we are using for this exercise. It is a good action image taken during an American Football game. The two main players displayed are the player carrying the ball and the defending player directly in front of him about to make the tackle. The two main players are almost lost in the jumble.
Had there been a wider aperture and/or longer lens used when the shot was taken, the background may have been blurred sufficiently to isolate the two players better.
Here we will increase the out of focus effect by using Adobe Photoshop Elements. The players in the background will be isolated through the Selection Tool and put out of focus using the Gaussian blur filter.
First the background is isolated so that it can be worked on separately. Using the Polygonal Lasso Tool the two main players are selected by “pulling” the selection around them as seen in Fig 2. The grass from below these players knees is also selected as it would be within the area of sharpness had the image been taken in this manner. Once the selection is completed, only the area within it will be affected by the Gaussian blur filter or any other alterations. In this case the main players were selected. In order to work on the background, Inverse must be selected to work on the image outside the selected area.
fig 2 Selecting Area

fig 3 Gaussian Blur Window
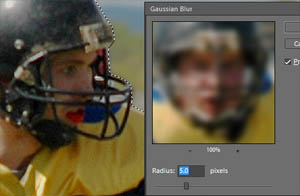
Clicking on Gaussian Blur opens the dialog box shown in fig 3. The effect of the blur is increased by a higher number inserted in the Radius box. The effect of this is in the preview window. The image on the workspace will show a preview of the effect as well.
fig 4 Finished Image
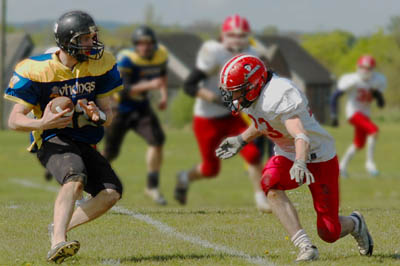
Like most effects and filters available in image editing programs, the effect can be taken too far and patterns begin to appear. Close inspection of the effect is necessary to avoid overdoing it.
In the finished image in fig 4, what is known as a short or shallow depth of field is displayed much better in the image.
For a complete course covering all aspects of digital image editing, enrol in our Digital Imaging Course.