
 |
The “Red eye” syndrome
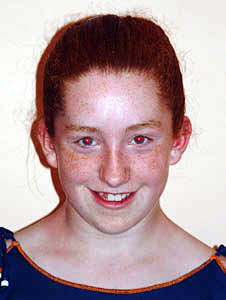
Often seen in pictures of people taken using flash, red eye has consistently been a problem since the introduction of built-in flash.
Red eye occurs because when flash is usually used, it is within a dimly lit location. In these circumstances the eyes are dilated and direct light tends to reflect off them. A similar thing happens when animals are caught in headlights at night, the eyes glow.
The reason this happens when using a compact camera is the design fault of the compact camera; the flash is too close to the lens. The flash lighting can then be seen reflecting off the retina of the eye.
This happens much less frequently with SLR cameras and detachable flashguns because the flash is further away from the lens. However it still is possible to get red eye even with an SLR if the pop-up flash is used or a long lens in combination with a hotshoe mounted flashgun. So in order to eliminate the rislk of red-eye, the further the flash is from the lens, the better.
The makers of compact cameras have tried to overcome this problem with Red Eye Reduction systems. Unfortunately this is not red eye removal and is not always 100% successful. Some work on the premise of firing the flash twice (or more) before taking the shot. The hope is that the eye will react to the bright flash and close down the pupil reducing the red eye effect.
In image editing programs there are various ways of removing red eye from an image. There are many programs with “quick fix” automated wizards or macros. These can be simple to use but the results vary. The best way is to do it yourself.
Here we will cover two different techniques of removing red eye. The results of each technique is dependent on the degree of red eye in the image being corrected.
Most editing programs have the tools we will cover to correct red eye. Basically these tools include a selection or masking tool; either the Magic Wand or freehand masking tool commonly called a lasso. A paint brush and/or the ability to desaturate (turn the area to black and white).
With both techniques the affected area (the red) is isolated using either the Magic Wand Tool or drawing around the area freehand. In Figure 2 the selected area has been created using the Magic Wand. For best coverage of the area Feathering should be adjusted and tested until the desired coverage of the area is achieved (usually 2 to 3 pixels).
Painting the Eye The Paint Brush is used to paint over the red area. Black is the best colour to use with the brush. The Magic Wand is best used when using a paint brush. The wand will not include highlights in the eyes so they will not be painted out as well. When using a selected area the size of the brush can be larger than the area because any detail outside the selected area will not be affected. Once you are satisfied with the result, deselect the area.
fig 2 Selecting the Area
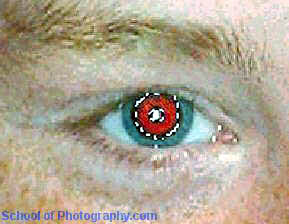
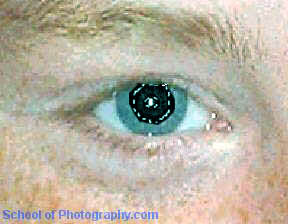
fig 3 Altering the Area
Desaturating the Eye
Desaturation can be performed on the red area of the eye.
 |
First we have to isolate the red area of the eyes. Isolating the area is best done by using the ‘Magic Wand’ or it’s equivalent.
Once this is achieved most editing programs have a ‘Desaturation’ or ‘Hue Shift’ command. This takes all colour out of the image or in this case the area that is selected. Colour information is still kept in the image. This turns the red to grey.
The area can be darkened to black by adjusting ‘Brightness'(Fig. 3). Other colours such as blue can be introduced into the selected area by using ‘Colour Balance’. When looking at the changes performed at such a magnification as the images above, it may look a bit artificial. To appreciate the success or failure of the work carried out, zoom the image out to its full size and study the correction carefully. If the image is to be printed, inspect it at a 1:1 magnification. The actual image proportion is often displayed next to the file name on top of the image.The finished image here is only 300 x 226 pixels in dimension and what you see is the actual 1:1 size here. An image this small of course can be very forgiving for rough alterations. Images that are destined to be printed will be much larger in size and demand close scrutiny.
For much much more on editing images, enroll in our Digital Imaging Course.